KeyBuild
1.056.10 [Build 3]
Release
Notes (right-click in this window to print)
|
NEW in version 1.056.10[3] Cap and Base Trusses are Not Outputting to the ITR Files with the Correct Geometry Fix The cap and base truss profiles are now being written with the correct geometry to the ITR files.
1.056[54] Truss Dropped Top Chord and Raised Bottom Chord Enhancements Enhancements have been made in
KeyBuild and KeyTruss to better support the dropping of flat truss top
chord segments and raising of flat truss bottom chord segments.
You now have the ability to drop the flat top chord and raise flat
bottom chord segments for any individual truss, all trusses in a framing
area, and trusses that are part of a Hip-End. You can define the
block thickness for dropping and raising chord sections. Trusses
are profiled correctly and will show the "dog ears" at pitch breaks.
And trusses will open in KeyTruss with the drop and raised chord
properties set. You also have the ability to continue to have the
program apply the previous dropped and raised truss chord functionality
for Step-Down Hip-End trusses. Previously in KeyBuild you could
only drop the flat top chord segments for the trusses behind the setback
girder, and only the profile was adjusted to accommodate the drop
without the desired "dog ears" at the top chord pitch breaks.
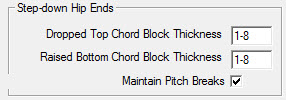
General Information Dialog Box Changes New settings in the Framing Members page of the General Information dialog box allow you to define the block thickness and an option to turn on the new functionality. The Dropped Top Chord Block Thickness field defines the top chord drop distance. The Raised Bottom Chord Block Thickness defines the bottom chord raise distance. When the Maintain Pitch Breaks option is left unchecked the program will continue to perform the old functionality; only flat top common trusses behind the setback girder in Hip-End sets will have their profiles adjusted and trusses will not have the "dog ears." When the Maintain Pitch Breaks option is checked on the new functionality will be applied to applicable trusses.
Changes to these settings will be applied to new trusses, and can be applied to existing trusses in a job by using the Re-Profile Members command in the Macros menu.
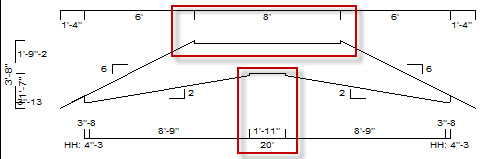
Display Changes Trusses with the new dropped top chord and raised bottom chord settings applied will be displayed properly with the "dog ears" in KeyBuild in the Animate and Solid-Model views. Also in the individual truss Profile view the dropped top chord and raised bottom chord will be displayed with the flat sections dimensioned.
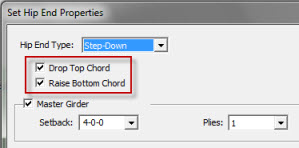
Truss Properties Changes To apply these new settings to trusses you need to turn on new property settings in the various truss properties dialog box. To apply these new settings to trusses created by the Hip-End Framer you can check on the new Drop Top Chord and Raise Bottom Chord checkboxes. Both these new checkboxes are available when you input and edit a Step-Down Hip-End. For Terminal and California Hip-Ends only the Raise Bottom Chord checkbox will be available. The drop and raise depth will come from the General Information Block Thickness settings. Previously the drop depth setting was in the Set Hip End Properties dialog box. Use the Save as Defaults button to save these settings for future Hip-Ends.
To apply these new settings to trusses created by the Area Framer you can check on the new Drop Top Chord and Raise Bottom Chord checkboxes. Both these new checkboxes are available in the Set Area Properties dialog box when you input and edit a Roof Truss Framing Area.
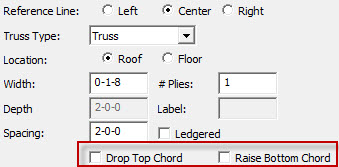
To apply these new settings to individual trusses
you can check on the new Drop Top Chord and Raise Bottom Chord
checkboxes in the Truss Properties dialog box during the input of a
single truss or by editing the properties of an existing truss.
These settings are available with all available truss types in this
dialog box; Common Truss, Valley Truss, Non-Structural Gable, Structural
Gable, and Valley Gable. Note: Save As Defaults does not hold for the Drop Top Chord and Raise Bottom Chord checkboxes.
To apply these new settings to Truss Girders you can check on the new Drop Top Chord and Raise Bottom Chord checkboxes in the Set Bearing Properties dialog box during the input, or by editing the properties of an existing Truss Girder.
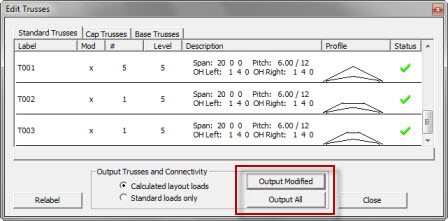
Edit Trusses Option To Not Delete Designed Trusses Previously in KeyBuild if you had output your truss profiles to KeyTruss, designed your trusses in KeyTruss, and then re-output profiles from KeyBuild, the designed trusses would have automatically been deleted. KeyBuild will now detect when you have already designed some or all of your trusses in KeyTruss when you re-output from Edit Trusses in KeyBuild. In Edit Trusses you use the Output Modified or Output All buttons to output your profiles to KeyTruss.
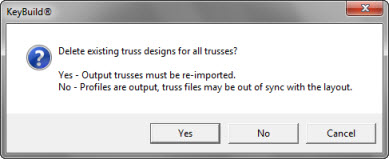
For a job where you have already designed trusses in KeyTruss when you output truss profiles from Edit Trusses in KeyBuild you will be prompted for if you want to delete or keep existing trusses designs. Selecting Yes will delete existing truss design files for designed trusses whose label matches the label of a truss profile you are outputting from Edit Trusses. For example if you had previously output and designed trusses T01 and T02, and then went to output the profile for T01 again, selecting Yes would delete the designed truss files for T01 but keep those for T02. Selecting Yes will also delete your existing KeyTruss truss-to-truss connectivity file for the job. Selecting No will output the truss profiles but will not delete any of the files for designed trusses.
Truss Label Cleared when Truss is Modified Running Edit Trusses will label the trusses in a job. Previously when you would modify a labeled truss, that truss would maintain its label until Edit Trusses was rerun with the re-labeling option. KeyBuild has been improved so now labeled truss will have their labels cleared when the profile is modified. Trusses that have their label cleared will be relabeled automatically the next time Edit Trusses is run. Modifications made with the Show / Edit Trusses Profile command that will clear truss labels include: - Add or Remove Cap Truss - Add or Remove Overhang - Top Chord or Bottom Chord Profile Edit - Top Chord or Bottom Chord Profile Copy
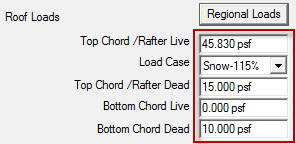
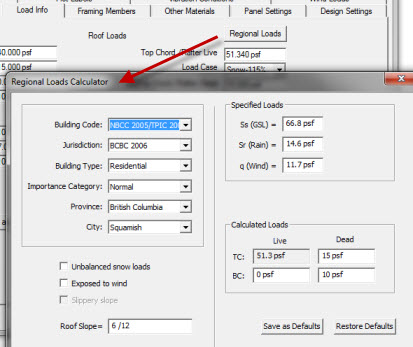
Truss Loading Output to KeyTruss Improvement When you output truss files from the Edit Trusses dialog box, truss information is generated and passed to the KeyTruss program. Previously the standard loading passed to KeyTruss was always sent as a whole number and did not include load values after the decimal place. KeyBuild will not output standard truss loading with accuracy to two decimal places. (Note the Regional Loads button is only available with a Canadian Building Code selected)
Saving Canadian Regional Loads Data When running with a Canadian Building Code, in KeyBuild's General Info | Load Info dialog box you can use the Regional Loads button to access the Regional Loads Calculator. This calculator allows you to select a location and calculate the roof top chord live load for that region. This information is now being saved with the job.
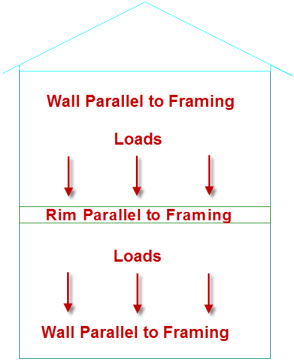
Changes to Rim and Blocking to Support Wall Loads from Above For truss designers in KeyBuild, when you have a multi-story building, the walls that are above and run parallel to floor framing receive Insufficient Bearing errors when running the Check Model, Edit Trusses, and Hanger Selection commands from the Design menu. When you receive insufficient bearing errors going into Edit Trusses you are then not able to use the Output with Loads option when generating output for your trusses.
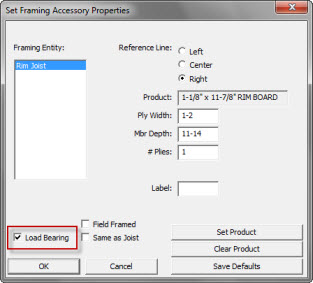
Load Bearing has been added to the available properties for rim and blocking in the Set Framing Accessory Properties dialog box. When rim is input as Load Bearing it will now support and transfer the loads from walls above. Use the Entities | Additional Framing command to draw in rim and blocking around the perimeter of your floor system. EWP designers using the Structure program to design floor systems should continue to not input rim and blocking in KeyBuild, and instead allow Structure to automatically place those members.
The Same as Joist checkbox has also been added to the Set Framing Accessory Properties dialog box, but is not yet supported by the program.
Changes to Trim and Extend and Improved Functionality and Recognition of 3D Interaction For more information on this functionality please contact Technical Support staff (303) 433-0135 for a demo.The new bevel logic for this enhancement applies to roof rafters, ceiling joist, jack trusses, corner girders, struts, floor joists, blocking, bracing, rim and floor blocking. There are two Gen Info | Framing Member settings that define whether or not bevels are applied. The floor joist settings define whether or not bevel logic will be applied to both roof and floor members.
Edit Trusses | Split Truss Fix When running Edit Trusses you can right-mouse click on a truss in a group of like consolidated trusses and use the Split command to split that truss out into its own consolidation group. In previous versions when you would split the truss and enter a new label, the new label was not honored. Instead KeyBuild would re-label the truss with the same label plus an 'a.' For example if you split a truss out of the T001 group, entered T16 as the new label, it would be labeled T001a. This has been fixed.
Side Jack Trusses Bottom Chord Loads Fix In previous versions of KeyBuild in Edit Trusses like side jack trusses in Hip-End sets with rafter and sub-girder framed corner sets were not always being consolidated together with the same label. The jack trusses were not consolidated because of a bug that caused different bottom chord loading to be applied. This bug has been fixed and like side jack trusses in rafter and sub-girder corner sets will now consolidate together in Edit Trusses and output to KeyTruss with the correct bottom chord loads.
California Master Girder ITR Files Missing Top Chord Extensions Fix In previous versions of KeyBuild the California Master Girder top chord extensions were not being written to the ITR files. This bug has been fixed.
Panel Rough Opening Resynchronizing Fix In
previous versions of KeyBuild if the opening in a Component File had a
SKU, the program was specifying the SKU in the opening thus causing
sizing and synchronization issues. By default the program will no
longer place a SKU in the hole of a .cmp file created by
Library-->Component File.
|


Keymark Enterprises, LLC
Copyright© 2011 Keymark Enterprises, LLC ALL RIGHTS RESERVED
Keymark®, KeyBuild®, Model™, Structure™, KeyBeam®, KeyComm®, KeyLat®, KeyMan®, KeyOpt®, KeyPanel®, KeyPlan®, KeyPlot®, KeyTruss®, KeyUp™, KeyWind™, and KeyBuildCAD™ are trademarks or registered trademarks of Keymark Enterprises, LLC